What Is Concrete Floor Polishing?
Concrete floor polishing transforms a porous concrete floor into a dense surface that resists water, oils and other contaminants. The process begins with rough grinding of the concrete floor using metal diamond pads (coarse diamond segments bonded in a metallic matrix).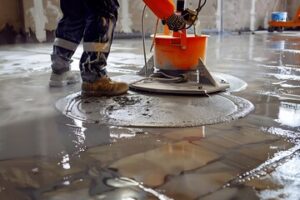
Crews then grind the concrete with increasingly finer grits of polishing wheels. You can choose to expose aggregate, create a smooth satin finish or add dyed color. Contact Concrete Floor Polishing Orange County for professional help.
Concrete floor polishing involves grinding the surface to create a high-sheen finish that reduces or eliminates the need for carpets or tile, which require expensive replacement and frequent cleaning with harsh chemicals. Concrete can be polished to a wide range of sheen levels, from a basic matte finish to a glassy mirror-like sheen. This process is a mechanical one, using heavy-duty industrial diamond tools to achieve the desired sheen. It’s important to evaluate the condition of your concrete before beginning the grinding and honing stages, as cracks or damage may affect the final result.
The first step in the concrete floor polishing process is to apply a chemical hardener and densifier to the concrete slab. This is necessary to help fill in the pores of the concrete, which will improve the consistency and overall appearance of the finished product.
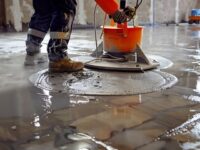
After the hardener and densifier have been applied to the concrete floor, the next step is to grind the surface using a resin bond diamond tool. This is a gradual process, working from a coarse grit to a finer one, often starting with 30/40 grit and progressing to 100/200 grit.
As the grinding process continues, a vacuum is used to remove the dust and debris. This is an important step, as the buildup of dirt and dust can prevent a smooth, even finish. This process also helps expose any flaws in the concrete that may need patching.
Once the grinding is complete, the concrete floor is ready for a final polishing with an impregnating enhancing sealer. This protects the concrete from wear, staining and spills, while allowing vapor transmission. The coating also enhances the color and shine of the concrete.
This protective coating needs to be reapplied periodically, depending on the amount of traffic and use. It’s important to maintain proper daily care of a polished concrete floor, including sweeping and mopping with a neutral pH cleaner, as well as periodic high-speed burnishing (using an 1,800-grit pad) to refresh and revive the shine. Regular ongoing evaluation of the concrete will also indicate when it is time to apply a new coat of sealant.
Grinding
During the grinding phase, contractors use heavy-duty polishing machines that gradually grind away the surface of concrete until a desired level of smoothness and sheen is achieved. The grinding process is often broken down into 10 or more stages, with each stage using a finer grit of abrasive to create a smoother and glossier finish.
The first step is to determine the level of sheen you want for your floor. This will dictate what type of equipment, tools and abrasives are used. Some clients like aggregate exposure, while others prefer a completely flat concrete surface. It is important to communicate these preferences to your contractor ahead of time, as these can have a significant impact on the final outcome.
Once the area is prepped, contractors will perform a thorough walkthrough to assess the condition of the floor and identify any cracks, damage or coatings that need to be removed. If necessary, a scarifier can be used to quickly remove any thick coatings or heavily damaged concrete.
Next, the wet grinding process is performed. Wet grinding uses water to wet the concrete dust, making it impossible for the dust to become airborne. This method eliminates the need for a tarp and plastic sheeting, which helps save time and money. The water also keeps contractors from breathing in the potentially hazardous silica dust created by dry grinding.
Wet grinding requires specialized diamond tooling that is layered with industrial diamonds to make it effective. These tools are placed onto the concrete floor and moved in a circular motion across the surface of the slab. The abrasive on the diamond tool is changed between each step to achieve the desired sheen, moving from a coarse grit down to a finer one with each pass over the surface.
When a level 2 sheen is achieved, the diamonds are replaced with steel wool or oxide pads to further smooth the surface. A chemical densifier is then applied to fill in pores and give the surface a more consistent look. Finally, a high-quality concrete sealant is used to protect the new floor from staining and premature wear.
Honing
The honing phase of concrete floor polishing is what creates that beautiful high sheen. It involves using finer diamond abrasives and progressing through increasingly-finer grits until the desired sheen is achieved. It’s important that property owners inform their contractors as to what level of sheen they want, as this can have a big impact on the grinding and honing process.
This is also a good time for them to specify concrete mix design and floor flatness ratings that are polishing-friendly. This will help achieve a better result and lower costs in the long run.
A well-trained crew will be able to properly grind and level the floor in this step, replacing the existing scratch pattern with a new one that is equal across the surface. It’s also the ideal time for them to apply stains or dyes to the concrete, should the client choose.
After the grinding and honing process is complete, a concrete densifier can be applied to the floor. This chemical treatment increases the concrete’s density and hardness, which aids in the polishing process and helps the finish last longer. It’s best to follow the densifier’s directions carefully, as this is a critical part of the process.
Some contractors offer a system that doesn’t require any physical refinement of the concrete and only includes hone and densifier steps. This is called a “half polish” system and it provides the appearance of a polished concrete floor without the higher cost or maintenance requirements. This is because the floor only goes through three steps of grinding (half the processing steps required for a true polished concrete floor). The surface is then densified, creating an excellent level of sheen that will hold up to heavy foot traffic and resist scratching.
Concrete polishing is much more technical than most people realize, and it requires a high level of skill and knowledge to get the most out of it. A skilled contractor will take a detailed and results-oriented approach to the job and be able to overcome pre-existing variables that cannot be controlled, such as the quality of the abrasives used, the floor flatness and concrete mix design.
Finishing
After the grinding and honing stages, the concrete is ready for the finishing phase. A chemical densifier is applied to the concrete floor, and a water-based or solvent-based concrete sealant can be added for extra protection and shine. The concrete polishing contractor can also apply anti-slip conditioners to the surface of the floor, which can improve traction and help prevent accidents in wet areas.
The next step is to polish the concrete with diamond abrasives. This can be done with a dry or wet polishing process, depending on the project and the desired look. Dry concrete polishing is performed using large, corded electrical machines or smaller hand-held power tools. This type of polishing is done with a sequence of increasingly fine grit diamond pads. Wet polishing is similar but uses water throughout the entire polishing process. This makes it a quicker, cleaner process that is suitable for larger areas.
Once the concrete is polished to your liking, it’s time to choose a color finish. Concrete stains and dyes are popular options, and they can give your floors a vibrant, customized look. They can range from solid colors to patterned designs and graphics.
Before applying the stain, the concrete needs to be fully dry. To speed up the drying process, the contractor can use a special dehydrating agent. The vapor barrier can also be used to protect the concrete from moisture, which can cause damage over time.
The vapor barrier also helps to prevent the stains from bleeding through the concrete. Once the stain has dried, the contractor can apply a concrete protective coating. The coating will protect the concrete from stains and other damaging elements, and it can last for years.
While there are many benefits of a concrete floor, not everyone wants to see exposed aggregate in their facility. In these cases, the concrete can be polished to a level that hides the aggregate, giving it a glossy appearance with no visible grit. This finish is popular in residential spaces, and it’s especially well suited to indoor pools or other wet areas.